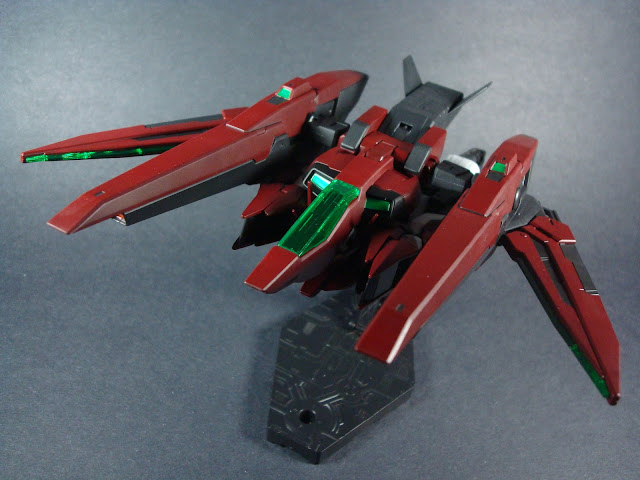
This kit has been long overdue, but I finally got around to photographing my entry for Dan's OOBBO contest. The colors came out better than I hoped it would. However, because the shoulders are not rotatable thanks to its transforming gimmick, I had a hard time posing this guy. It was a fun kit overall!
For this kit, I've used some fluorescent colors to get the glowing effect when its under black lighting to illuminate the barrels of the weapons to make it seem like it's firing its beam rifles and cannons as well as the eyes and the cameras. I've tried to take some pictures using black light, but since my camera doesn't have UV filtering, I couldn't properly capture the glow effect. I promise the colors are much more vibrant in real life. I wish I could properly capture it so I can show you guys, but the ones I have will have to do for now. The black light pictures are at the end of the page.
Paint Guide
Notes: Unless noted, all paints are from the Mr. Color line. Also, I've gave each piece, other than the clear ones, an initial layer of Black (2).
Primer
- Mr. Surfacer 1200
Dark Red - Armor pieces, Weapons, Backpack
- 80% Wine Red (100) + 20% Red (3)
White - Armor pieces, GN Engine
- 100% White (1)
Dark Blue - Armor pieces, Hands, Feet, Backpack, Weapons
- 100% Midnight Blue (71)
Eyes
- 100% Gaia Fluorescent Green (104)
- Black Surroundings: 100% Model Master Classic Black Enamel
Fluorescent Green - Camera, Lens, Cockpit hatch, GN Blades
- 100% Gaia Fluorescent Green (104)
Fluorescent Red - Inside of barrels
- 100% Gaia Fluorescent Red (103)
Panel Lines
- Model Master Gunship Grey
- Model Master Classic Black
Top coat
- Super Clear Flat (182)
- Super Clear III (GX 100) - clear pieces only
Mobile Suit
Weapons
Action Poses


 |
| Favorite pose and angle |
Black Light
The last 3 pictures go from having the most extra white light to having the least. I needed to have that extra white light so the camera would be able to focus on the subject.
Some Final Thoughts
The kit is very back heavy since the backpack weighs as much as the suit itself. I've tried, but failed to have the kit stand without having it lean against something. Having an action base will be worthwhile. Plus, Harute looks much better when it's airborne where it's meant to be.
I do have some complaints about how the shoulder attaches though. From my WIP 1, at the end of the page, you can see how the shoulders are on a ball joint, meaning you can't rotate the shoulders. Because you can only have minimal movement, posing can be troublesome.
When it's in its Mobile Armor mode, the suit itself is well hidden under the backpack part thanks to the backpacks ridiculous size. In it's MA mode, you can only see the suit's legs and shoulders which helps fill in the gaps you can see in the pictures directly below.
 |
| Backpack |
 |
| Transformed suit |
 |
| Combined |
The size isn't all that bad though. I like how bulky the MA mode is. The kit is a combination of both the GN Archer (the backpack) and Arios Gundam (the suit). Even in the movie, both Allejuyah and Marie pilots the suit. So, to me at least, the size makes sense. Yes, it deviates from its predecessor's sleek high speed design, but to be honest, I'd rather not see another very similar iteration.
The color separation is nicely done as well. Other than the eyes piece and a part on each weapon, I barely had to do any masking.
I also like the inclusion of the rear tail missile container. It is part of Harute's overall design, but if you really want to, you can use the container as an extra attachment on the HG Kyrios to help recreate some of the anime's early season 1 scenes.
That's all I have to say. I hope you guys look forward to my next project!
Questions, comments, or advice are more than welcomed!
Thanks for reading!


May i know that for gaianotes 104 fluorescent green need to mix anything before can have fluorescent green effect in dark? or it must explore to UV light before can have the effect? Yesterday night i try but just explore to normal home white light but seen like no effect at all...
ReplyDeleteSorry about the late reply. You need a blacklight to see the fluorescent effect. They sell them online or at your local hardware stores.
DeleteHi, may i know what is the different UV light and backlight?
DeleteJeremy,
DeleteA blacklight bulb you find at your local stores will produce UV lights.
i see, thank you so much for the info.
DeleteActually is it need a layer of coating on top of fluorescent paint?
DeleteSorry for the really late reply Jeremy. It's been quite a while since I finished this kit and it's in storage right now so I won't be able to get it confirmed, but I believe I finished it with a layer of flat coat on top of the fluorescent paint. Since the topcoat is clear I don't think it will damage the fluorescent paint. I would just make sure the paint and topcoat is the same type such as lacquer with lacquer or acrylic with acrylic.
Delete